皆様、Bluemixで画像処理系のAPIを利用していますか?。
以前はAlchemyAPIで顔認識といった事が出来ましたが、現在はAlchemyAPIの画像処理機能は全てVisual Recognitionに統合されました。
今回紹介するVisual RecognitionはWatsonAPIサービスの1つです。
皆様はWatsonAPIをプログラムに組み込む際は、Watson Developer Cloudで配布されているSDKを利用されることが多いかと思います。
SDKは非常に便利なのですが、全てのプログラム言語で用意されてはおりません。
SDKが無い場合はAPIのリファレンスを確認し、仕様に合わせてAPIをコールするプログラムを1つずつ作成する必要があります。
PHPもSDKが存在しない言語の1つになります。
そこで今回の記事では、PHPからVisual Recognition V3のAPIをコールするためのプログラムの書き方を纏めてみました。
しかも、作成したプログラムはハッピーターンを識別出来てしまう(たぶん)夢のデモとなっておりますので、良かったらデモとして利用してみて下さい。
(プログラムの利用は自己責任でお願い致します)。
目次
デモの概要
概要図
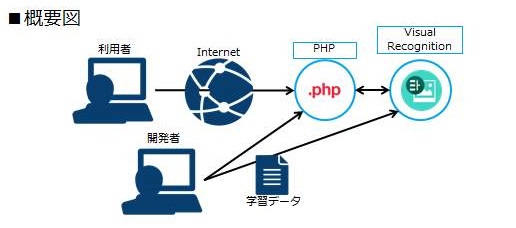
今回のデモの概要図は以下の通りです。
開発者のPCはWindows7になりますので、以下に記載した手順等はWindows環境での利用を想定しております。
プログラムのディレクトリ構造
ブログ内で記載したプログラムをローカルPC上に配置する場合は以下の様なディレクトリ構造で配置をお願い致します。
demo(ディレクトリ:名前はご自由に)
|-index.html(プログラム:トップページ)
|-ht-decision.php(プログラム:Visual Recognitonの解析結果を表示)
|-function.php(プログラム:ht-decision.php内で利用する関数を定義)
|-files(ディレクトリ:アップロードされた画像の配置場所)
|-.bp-config(ディレクトリ:ランタイムに追加でインストールするモジュールを記載した設定ファイルの置き場)
|-options.json(設定ファイル:ランタイムに追加でインストールするモジュールを記載するファイル)
※上記ディレクトリ構造でPHPのランタイムに「cf push」する際は、「files」ディレクトリ内に適当なファイルを配置してコマンドを実行して下さい。理由は、「cf push」では空のディレクトリをランタイム上にアップロードする事が出来ないからです。プログラム上、必要なディレクトリが存在する場合は何かファイルを配置して「cf push」コマンドを実行して下さい
学習データについて
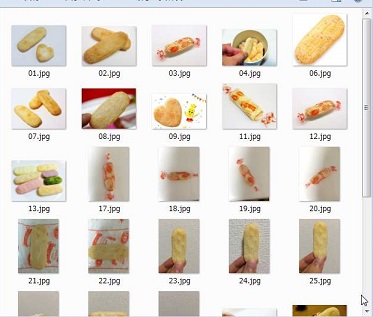
学習データには以下を利用したました。
①:正の画像
・新潟県が産んだレジェンドお菓子「ハッピーターン」を利用します
・画像データはインターネットや実際に購入して撮影したハッピーターンの画像を40枚ほど準備しました
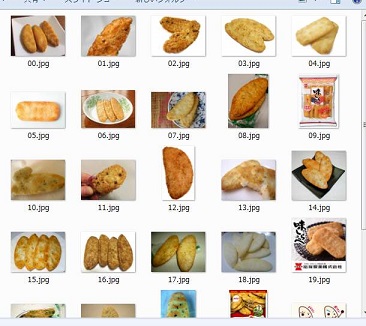
②:負の(ネガティブ)画像
・新潟県が産んだもう一つの最強のお菓子「ばかうけ」と、北海道の銘菓でほぼハッピーターンのようなお菓子「味しらべ」を利用します
・画像データはインターネットから30枚ほど準備しました
※注意事項
・今回学習データで利用する上記の画像はブログ内で配布は致しません、もし同様のデモを実施する場合は皆様で画像データの準備をお願い致します。
事前準備
事前にインストールが必要なツール一覧
Visual Recognitionの環境を準備構築
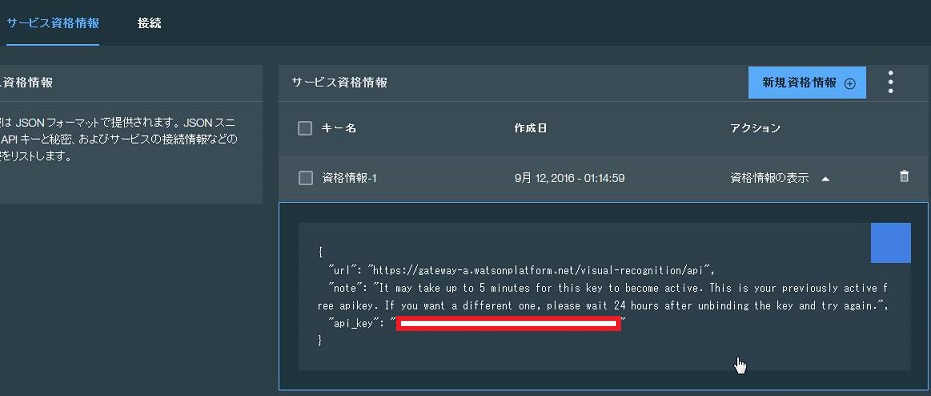
Bluemixにログイン後、「カタログ>Watson>Visual Recognition」を選択して、環境の構築を行って下さい。

環境の構築後、VisualRecognitionに接続するためのAPIKeyを忘れずに取得しましょう。
学習データのアップロードと学習結果の確認
初めに、上記で説明した画像データをzipファイルとして纏めます。
今回はハッピーターンの画像を「happyturn.zip」、ばかうけ&味しらべの画像を「negative.zip」として纏めました。
先ほど取得したkey情報を基に、コマンドプロンプト上でcurlコマンドを使い学習データをPOSTします。
POST完了後は学習状況の確認コマンドを実行し、終了するまで待機して下さい。
コマンドのサンプル例は以下の通りです
○コマンド例
・学習データのupload
curl -k -X POST -F "ht_positive_examples=@happyturn.zip"
-F "negative_examples=@negative.zip" -F "name=ht"
"https://gateway-a.watsonplatform.net/visual-recognition/
api/v3/classifiers?api_key=<"input your api key">&version=YYYY-MM-DD"
・学習状況の確認
curl -k -X GET  "https://gateway-a.watsonplatform.net/visual-recognition/api/
v3/classifiers/<"input classifier id">?api_key=<"input your api key">
&version=YYYY-MM-DD"
{
"classifier_id": "XXXXX",
"name": "ht",
"owner": "XXXXX",
"status": "ready",
"created": "XXXXX",
"classes": [{"class": "ht"}]
}
○コマンド補足
・curlコマンドを実行する際はzipファイルが配置されたディレクトリで実行すること
・「YYYY-MM-DD」はPOSTした日付に変更して下さい
・所々「ht」とありますが、これはHappyTurnの略です。自由に変更出来ますので、皆様の環境に合わせて修正して下さい
・「curl -k -X GET~」を実行した際の結果で「”status”: “ready”」と表示されたら、Watsonの学習は終了した合図になります
・「classifier_id」はプログラムに利用するため、忘れずにメモしておいて下さい
プログラム
プログラムの概要
今回作成したプログラムは「html+bootstrap(css)+php」をベースに作成しております。
○ソースコード
以下、bitbucketに今回デモで作成したソースコードをアップロード致しました。
https://bitbucket.org/personalok/demo-happyturn/src
○index.html
トップページになります。アップロードする画像のフォームとプレビュー機能を提供しています。
html+bootstrap+javascriptで作成しておりますが、特に作りこんだ部分はないため説明は省略します。
<!DOCTYPE html>
<html lang="ja">
<head>
  <meta http-equiv="Content-Type" content="text/html;charset=UTF-8" />
  <meta name="viewport" content="width=device-width">
  <title>ハッピーターン判定デモ</title>
  <!-- Latest compiled and minified jquery -->
  <script src="https://ajax.googleapis.com/ajax/libs/jquery/3.1.0/jquery.min.js"></script>
  <!-- Latest compiled and minified CSS -->
  <link rel="stylesheet" href="https://maxcdn.bootstrapcdn.com/bootstrap/3.3.7/css/bootstrap.min.css" integrity="sha384-BVYiiSIFeK1dGmJRAkycuHAHRg32OmUcww7on3RYdg4Va+PmSTsz/K68vbdEjh4u" crossorigin="anonymous">
  <!-- Latest compiled and minified JavaScript -->
  <script src="https://maxcdn.bootstrapcdn.com/bootstrap/3.3.7/js/bootstrap.min.js" integrity="sha384-Tc5IQib027qvyjSMfHjOMaLkfuWVxZxUPnCJA7l2mCWNIpG9mGCD8wGNIcPD7Txa" crossorigin="anonymous"></script>
  <style type="text/css">
    .img-thumbnail { max-width: 50%; }
  </style>
</head>
<body>
  <div class="container">
    <h3>ハッピーターン判定デモサイト</h3>
    <p class="help-block">※ハッピーターンの画像をアップロードして下さい(最大2MB、拡張子:jpgのみ)</p>
    <form class="form-group" name="form1" method="post" action="./ht-decision.php"  enctype="multipart/form-data">
      <input type="file" id="files" name="files[]"><br>
      <input type="submit" class="btn btn-info btn-lg btn-secondary" value="判定実施">
      <p class="help-block">###画像プレビュー###</p>
      <output id="list"></output>
      <script>
        function handleFileSelect(evt) {
            var files = evt.target.files; // FileList object
            // Loop through the FileList and render image files as thumbnails.
            for (var i = 0, f; f = files[i]; i++) {
              // Only process image files.
              if (!f.type.match('image.*')) {
                continue;
              }
              var reader = new FileReader();
              // Closure to capture the file information.
              reader.onload = (function(theFile) {
                return function(e) {
                  // Render thumbnail.
                  var span = document.createElement('span');
                  span.innerHTML = ['<img src="',e.target.result,'" class="img-thumbnail" title="',
                  escape(theFile.name),'" />'].join('');
                  document.getElementById('list').insertBefore(span, null);
                };
              })(f);
              // Read in the image file as a data URL.
              reader.readAsDataURL(f);
            }
          }
          document.getElementById('files').addEventListener('change', handleFileSelect, false);
        </script>
      </form>
    </div>
  </body>
  </html>
○ht-decision.php
VisualRecognitionの判定結果を表示するためのページです。ページ内で、画像の回転処理※1、VisualRecognitionへのPOST、結果表示処理を行っています。
各処理は「function.php」で実施しておりますので、そちらで解説します。
※1:スマホで撮影された写真は、撮影した向きではない方向で写真がアップロードされるため、その補正で実施しています
<!DOCTYPE html>
<html lang="ja">
<head>
  <meta http-equiv="Content-Type" content="text/html;charset=UTF-8" />
  <meta name="viewport" content="width=device-width">
  <title>ハッピーターン判定デモ</title>
  <!-- Latest compiled and minified jquery -->
  <script src="https://ajax.googleapis.com/ajax/libs/jquery/3.1.0/jquery.min.js"></script>
  <!-- Latest compiled and minified CSS -->
  <link rel="stylesheet" href="https://maxcdn.bootstrapcdn.com/bootstrap/3.3.7/css/bootstrap.min.css" integrity="sha384-BVYiiSIFeK1dGmJRAkycuHAHRg32OmUcww7on3RYdg4Va+PmSTsz/K68vbdEjh4u" crossorigin="anonymous">
  <!-- Latest compiled and minified JavaScript -->
  <script src="https://maxcdn.bootstrapcdn.com/bootstrap/3.3.7/js/bootstrap.min.js" integrity="sha384-Tc5IQib027qvyjSMfHjOMaLkfuWVxZxUPnCJA7l2mCWNIpG9mGCD8wGNIcPD7Txa" crossorigin="anonymous"></script>
  <style type="text/css">
    body { padding-bottom: 200px; }
  </style>
</head>
  <nav class="navbar navbar-default navbar-fixed-bottom">
    <div class="container-fluid">
      <div class="navbar-header">
        <button type="button" class="navbar-toggle" data-toggle="collapse" data-target="#gnavi">
          <span class="sr-only">メニュー</span>
          <span class="icon-bar"></span>
          <span class="icon-bar"></span>
          <span class="icon-bar"></span>
        </button>
      </div>
      <div id="gnavi" class="collapse navbar-collapse">
        <ul class="nav navbar-nav navbar-right">
         <p class="navbar-text"><a href="/index.html">トップページへ戻る</a></p>
        </ul>
      </div>
    </div>
  </nav>
<body>
  <div class="container">
    <h3>ハッピーターン判定結果</h3>
    <h4>■結果</h4>
    <?php
      // セッション開始
      session_cache_limiter('private_no_expire');
      @session_start();
      // 外部関数呼び出し
      require_once __DIR__.'/function.php';
      // 言語設定とエラー出力設定
      setlocale(LC_ALL, 'ja_JP.UTF-8');
      //ini_set('display_errors', 1);
      // 変数宣言
      $upload= "files/".date("YmdHis_")."before.jpg";
      $output = "files/".date("YmdHis_")."after.jpg";
      $map = "files/map.jpg";
      $replace_w = array("_before","_after");

      // main処理
      //// ファイルアップロード処理
      if(is_uploaded_file($_FILES["files"]["tmp_name"][0])) {
        if(move_uploaded_file($_FILES["files"]["tmp_name"][0],$upload)) {
          //echo "<p>". $_FILES["files"]["name"][0] . "をアップロードしました。</p><br>";
        } else {
          echo "アップロードエラー<br>";
        }
      }
      //// 回転処理
      orientationFixedImage($output,$upload);

      //// ハッピーターン認識
      $result = VR_POST($output);

      //// 結果表示
      $Table1 = "<table class=\"table table-bordered table-sm\">";
      $Table1 .= "<tr><th calss=\"col-sm-2\">Classes</th>"
                 ."<th calss=\"col-sm-2\">Score</th><th calss=\"col-sm-3\">Watsonさんのコメント</th></tr>";
      if(!empty($result["images"][0]["classifiers"][0]["classes"][0]["score"])){
        $Score = $result["images"][0]["classifiers"][0]["classes"][0]["score"]*100;
      }else{
        $Score = 0;
      }
      if($Score >= 50){
        $Table1 .= "<tr class=\"success\"><td>ハッピーターン</td><td>{$Score}%</td>"
                   ."<td>コレハ「ハッピーターン」デスネ。「ハッピーターン」サイコウ。ハッピーターンタベタイ</td></tr>\n";
      }else{
        $Table1 .= "<tr class=\"warning\"><td>ハッピーターン</td><td>{$Score}%</td>"
                   ."<td>「ハッピーターン」イガイノオカシハニンシキデキマセン。コウバイデカッテキテネ☆</td></tr>\n";
      }
      $Table1 .= "</table>";
      echo "{$Table1}";
      $Image = "<img src=\"$output\" alt=\"result\" width=\"200\" height=\"300\"><br>";
      echo "{$Image}";
    ?>
    <h4>■生Json</h4>
    <?php
      //// JSON結果の出力
      echo "<pre>";
      print_r(json_encode($result,JSON_UNESCAPED_UNICODE|JSON_UNESCAPED_UNICODE|JSON_UNESCAPED_SLASHES));
      echo "</pre>";
      //// 古いアップロード画像の削除
      $delet_time = date('YmdHis',strtotime( "-5 min" ));
      $dir = opendir("files/");
      while (false !== ($file = readdir($dir))){
        if($file[0] != "."){
          $delet_file = "files/".$file;
          $target = basename($file, ".jpg");
          $delet_file_time = str_replace($replace_w,'',$target);
          if($delet_time > $delet_file_time) {
            unlink($delet_file);
          }
        }
      }
      closedir($dir);
    ?>
  </div>
</body>
</html>
○function.php
ht-decision.phpで呼びだされている関数を記載したプログラムです。
画像回転処理用関数、VisualRecognitionへのPOSTと実行結果取得関数等があります。
<?php
//使用例/////////////////////////////////
//orientationFixedImage($output,$input);
////////////////////////////////////////
// 画像の左右反転
function image_flop($image){
  // 画像の幅を取得
    $w = imagesx($image);
  // 画像の高さを取得
    $h = imagesy($image);
  // 変換後の画像の生成(元の画像と同じサイズ)
    $destImage = @imagecreatetruecolor($w,$h);
  // 逆側から色を取得
    for($i=($w-1);$i>=0;$i--){
        for($j=0;$j<$h;$j++){
            $color_index = imagecolorat($image,$i,$j);
            $colors = imagecolorsforindex($image,$color_index);
            imagesetpixel($destImage,abs($i-$w+1),$j,imagecolorallocate($destImage,$colors["red"],$colors["green"],$colors["blue"]));
        }
    }
    return $destImage;
}

// 上下反転
function image_flip($image){
  // 画像の幅を取得
    $w = imagesx($image);
  // 画像の高さを取得
    $h = imagesy($image);
  // 変換後の画像の生成(元の画像と同じサイズ)
    $destImage = @imagecreatetruecolor($w,$h);
  // 逆側から色を取得
    for($i=0;$i<$w;$i++){
        for($j=($h-1);$j>=0;$j--){
            $color_index = imagecolorat($image,$i,$j);
            $colors = imagecolorsforindex($image,$color_index);
            imagesetpixel($destImage,$i,abs($j-$h+1),imagecolorallocate($destImage,$colors["red"],$colors["green"],$colors["blue"]));
        }
    }
    return $destImage;
}

// 画像を回転
function image_rotate($image, $angle, $bgd_color){
    return imagerotate($image, $angle, $bgd_color, 0);
}

// 画像の方向を正す
function orientationFixedImage($output,$input){
  $re = "";
    $image = imagecreatefromjpeg($input);
    $exif_datas = exif_read_data($input);
    if(isset($exif_datas['Orientation'])){
        $orientation = $exif_datas['Orientation'];
        if($image){
            if($orientation == 0){// 未定義
            }else if($orientation == 1){// 通常
                imagejpeg($image ,$output);
            }else if($orientation == 2){// 左右反転
                $re = image_flop($image);
        imagejpeg($re ,$output);
            }else if($orientation == 3){// 180°回転
                $re = image_rotate($image,180, 0);
        imagejpeg($re ,$output);
            }else if($orientation == 4){// 上下反転
                $re = image_Flip($image);
        imagejpeg($re ,$output);
            }else if($orientation == 5){// 反時計回りに90°回転 上下反転
                $rotate = image_rotate($image,90, 0);
                $re = image_flip($rotate);
        imagejpeg($re ,$output);
            }else if($orientation == 6){// 時計回りに90°回転
                $re = image_rotate($image,270, 0);
        imagejpeg($re ,$output);
            }else if($orientation == 7){// 時計回りに90°回転 上下反転
                $rotate = image_rotate($image,270, 0);
                $re = image_flip($rotate);
        imagejpeg($re ,$output);
            }else if($orientation == 8){// 反時計回りに90°回転
                $re = image_rotate($image,90, 0);
        imagejpeg($re ,$output);
            }
        }
    }else{
    imagejpeg($image ,$output);
    }
}

// ハッピーターン認識処理(Visual RecognitionのPOST)
function VR_Post($jpg){
  try {
    #変数宣言
    $url = 'https://gateway-a.watsonplatform.net/visual-recognition/api/v3/classify'
          .'?api_key=<input your api key>&version=YYYY-MM-DD';
    $curl = curl_init();
    $data = array("images_file" => new CURLFile($jpg,mime_content_type($jpg),basename($jpg)),
                    "classifier_ids" => "<input your classifier id>");
    curl_setopt($curl, CURLOPT_URL, $url);
    //curl_setopt($curl, CURLOPT_HTTPHEADER, array('Content-Type: multipart/form-data'));
    curl_setopt($curl, CURLOPT_POST, TRUE);
    curl_setopt($curl, CURLOPT_POSTFIELDS, $data);
    curl_setopt($curl, CURLOPT_VERBOSE, TRUE);
    curl_setopt($curl, CURLOPT_RETURNTRANSFER, TRUE);
    $vr_exec = curl_exec($curl);
    curl_close($curl);
    $re = json_decode($vr_exec,true);
    return $re;
  } catch(Exception $e){
    echo $e->getMessage();
  }
}

?>
今回Visual Recognitionへ画像をPOST&結果を受け取っている処理は以下の部分になります。
$url = 'https://gateway-a.watsonplatform.net/visual-recognition/api/v3/classify'
.'?api_key=<"input your api key">&version=YYYY-MM-DD';
$curl = curl_init();
$data = array("images_file" => new CURLFile($jpg,mime_content_type($jpg),basename($jpg)),
"classifier_ids" => "<input id="" type="text" />");
curl_setopt($curl, CURLOPT_URL, $url);
//curl_setopt($curl, CURLOPT_HTTPHEADER, array('Content-Type: multipart/form-data'));
curl_setopt($curl, CURLOPT_POST, TRUE);
curl_setopt($curl, CURLOPT_POSTFIELDS, $data);
curl_setopt($curl, CURLOPT_VERBOSE, TRUE);
curl_setopt($curl, CURLOPT_RETURNTRANSFER, TRUE);
$vr_exec = curl_exec($curl);
curl_close($curl);
特に以下が肝です。phpで画像データを指定する場合は「CURLFile」で指定する必要がありますので、ご注意下さい。
$data = array("images_file" => new CURLFile($jpg,mime_content_type($jpg),
basename($jpg)),"classifier_ids" => "<input id="" type="text" />");
○.bi-config/options.json
PHPランタイムに追加で必要なモジュールを記載する設定ファイルです。
プログラムで「gd」、「exif」、「curl」、「fileinfo」を利用しておりますが、下記ファイルを作成してアップロードしないと、標準のPHPランタイムではエラーが出ますのでご注意下さい。
{
"PHP_EXTENSIONS": ["gd","exif","curl","fileinfo"]
}
プログラムの実行
ダウンロードして頂いたソースコードを修正し、「cf push」コマンドでアップロードをして下さい。
正常にソースコードのアップロードとデプロイが完了した事を確認し、ランタイムから払いだされているURLにアクセスして頂くと以下の様な画面が表示されます。
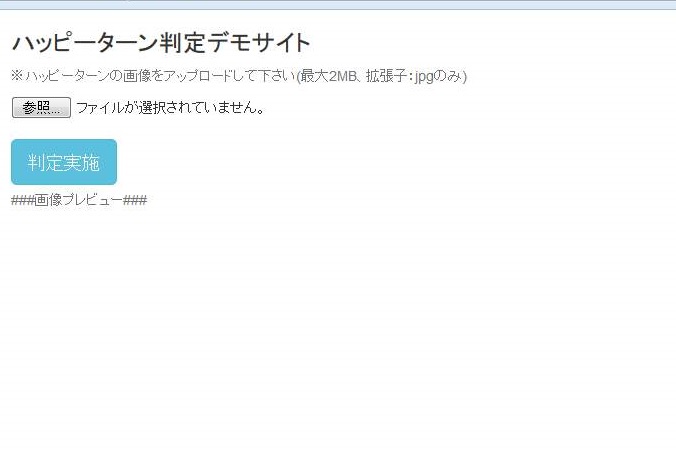
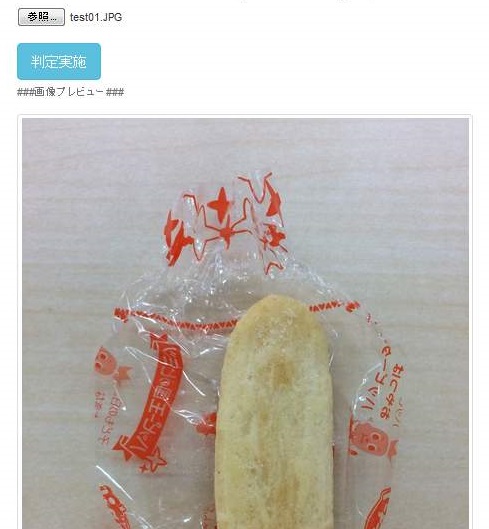
識別したい写真を「参照」ボタンから選択頂くと、画面上にプレビューが表示されます。
問題が無ければ「判定実施」ボタンをクリックして下さい。
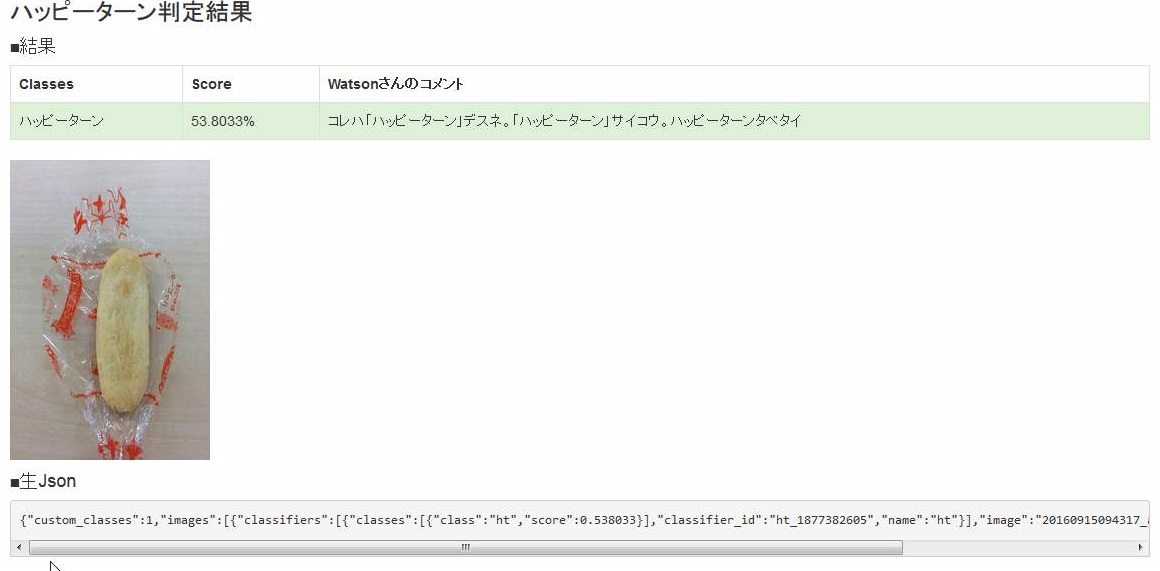
ハッピーターンと思われる画像であれば、結果の欄にハッピーターンであるという表示がされます!
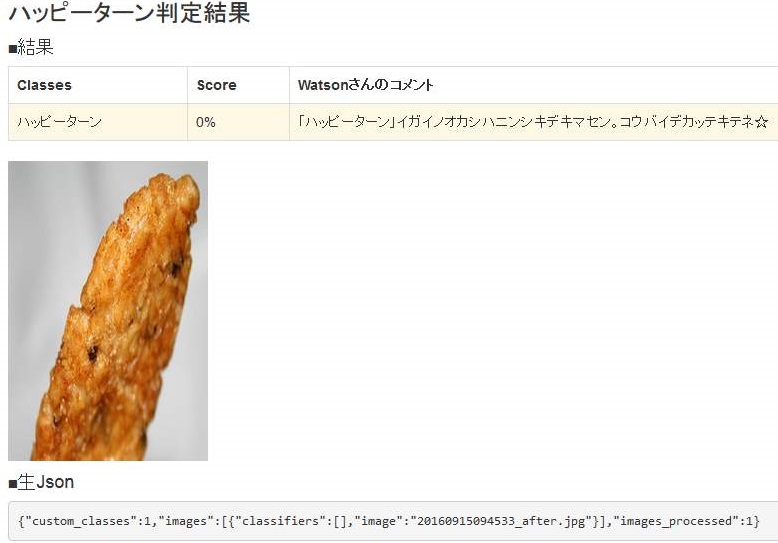
ハッピーターン以外の画像ですと、ハッピーターンでは無いという結果が表示されます!
まとめ
如何だったでしょうか。
VisualRecognitionをphpで利用する方法が少しでも皆様に伝わって頂けたら幸いかと思います。
また、今回作成したデモは先日開催されましたOpen Clouda Innovation Festaにて、NI+Cの展示ブースで展示致しました。
少しでもWatsonの良さが伝わったのではないかと思っています。


