【Illumio#2】Managing Communication through Illumio’s Zero Trust Segmentation (Micro Segmentation)
投稿者:NI+C engineer in charge of Illumio
In our previous discussion, we explored modern ransomware trends, introduced Illumio, and expounded on communication visualization.
In this article, our focus will be on how to utilize Illumio to control communication.
1.Delving into Communication Control
Let’s start by explaining the concept of communication control with Illumio.
The advantage of utilizing Illumio lies in the control it offers over communication; this control bolsters security and strengthens compliance.
Once ransomware manages to infiltrate your system, it can move laterally within your network undetected, potentially causing damage to expand.
In response, Micro-segmentation serves as a protective measure by dividing the network into smaller segments to minimize the potential damage. Illumio is specifically designed to manage such instances.
2. Examining Illumio’s Control Modes
Illumio offers three modes for controlling communication blockades: ‘Visibility Only’, ‘Selective’, and ‘Full’.
We refer to these as ‘enforcement’ modes.
- In the ‘Visibility Only’ mode, the system merely visualizes but does not block any transactions. This is the mode we activated during visualization in our previous discussion.
- The ‘Selective’ mode, by default, allows all communication and only blocks specific communication.
- The ‘Full’ mode, on the other hand, blocks all communication by default, only allowing specific communication to pass through.

If precise control over your communications is desired, the ‘Full’ mode would be the optimal choice.
However, you need to be cautious because activating the ‘Full’ mode without setting any permission rules results in an inability to establish connections.
It’s possible to operate the ‘Selective’ mode for a set period before transitioning into the ‘Full’ mode.
3. Process for Blocking Communication
In this section, we delve into the deployment of Selective mode to block SSH traffic to designated IP addresses.
You will find servers equipped with the Illumio Virtual Enforcement Node (VEN).

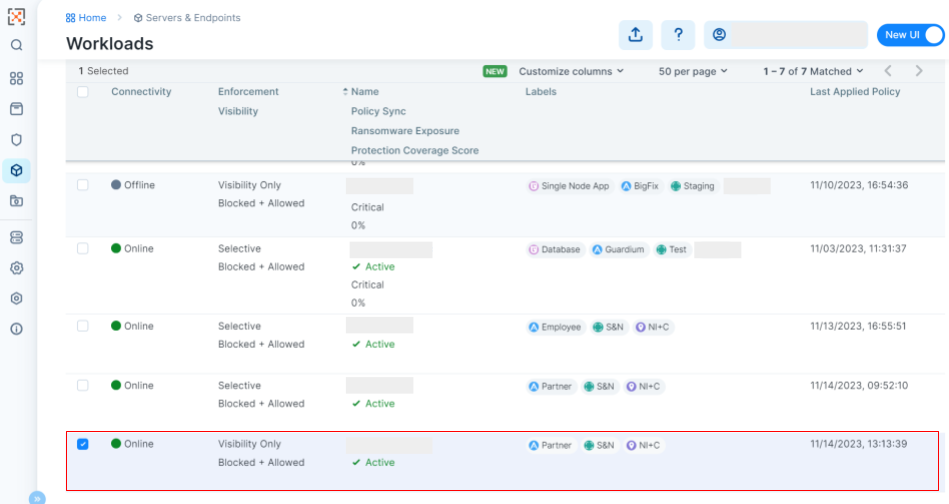
First, put a check next to the workload you intend to adjust.
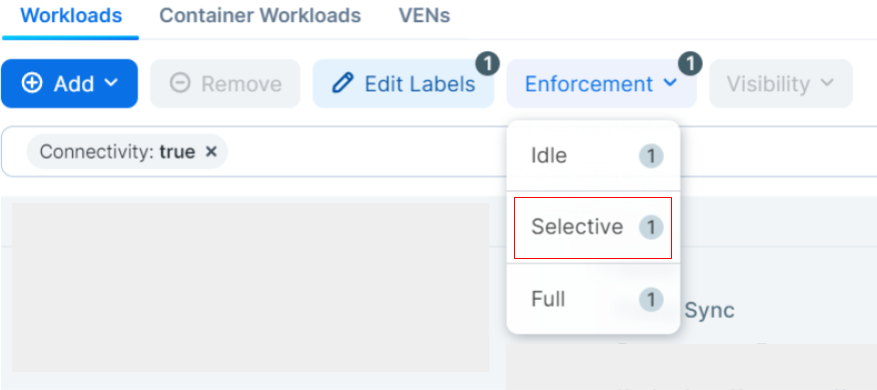
Next, select the mode of your choice from the “Enforcement” menu at the top of the interface.
For the purposes of this guide, opt for Selective mode.
Formulating and Implementing Policies
Our goal is to generate a policy that obstructs SSH traffic directed at a specific IP address.
With Selective mode activated, the default setting permits all traffic (Allow).
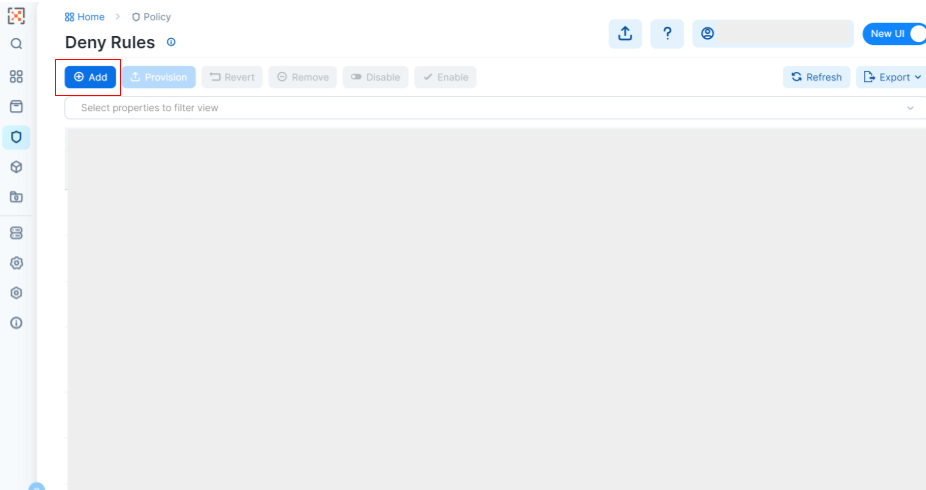
To obstruct only the targeted traffic while allowing other traffic to pass, we must opt for “Deny Rules” and proceed with rule creation.

Click “Add” to create a new rule.
Now, we will configure the detailed settings for the rules..
In the “Name” field, assign a name to the rule — we’ll name it “SSH_test” to signify its function.
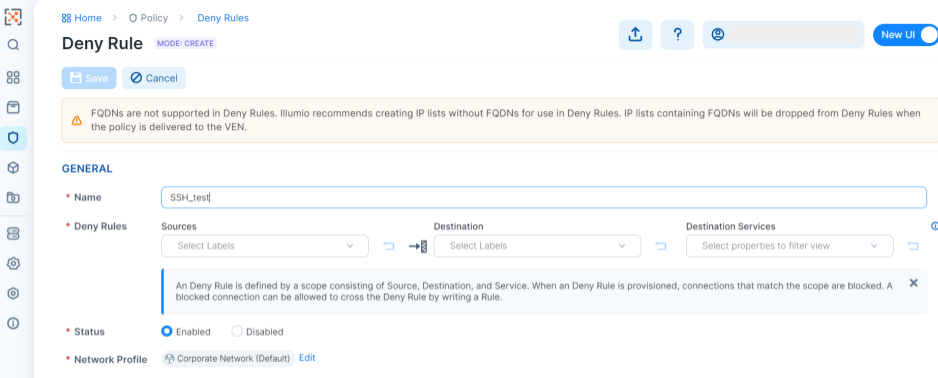
Under “Sources”, you can use predefined labels to determine the origin of the traffic.
*For further insight on labeling, refer to our previous entry.

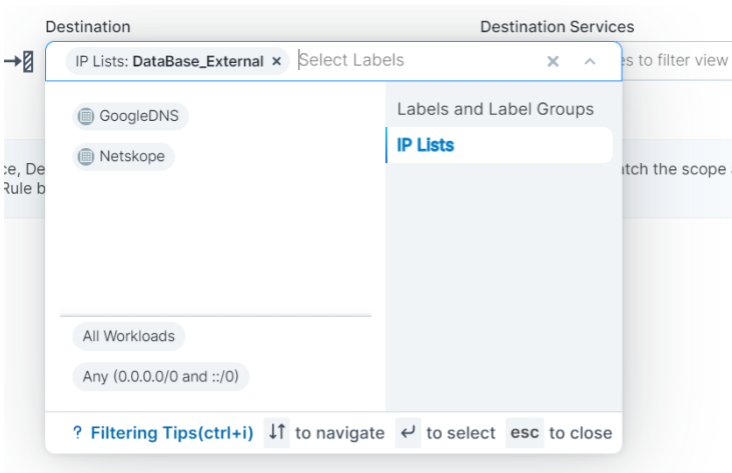
In the “Destination” field, you can specify the target of the traffic.
In the same way as the “Sources” section, you can use labels to select your destinations.
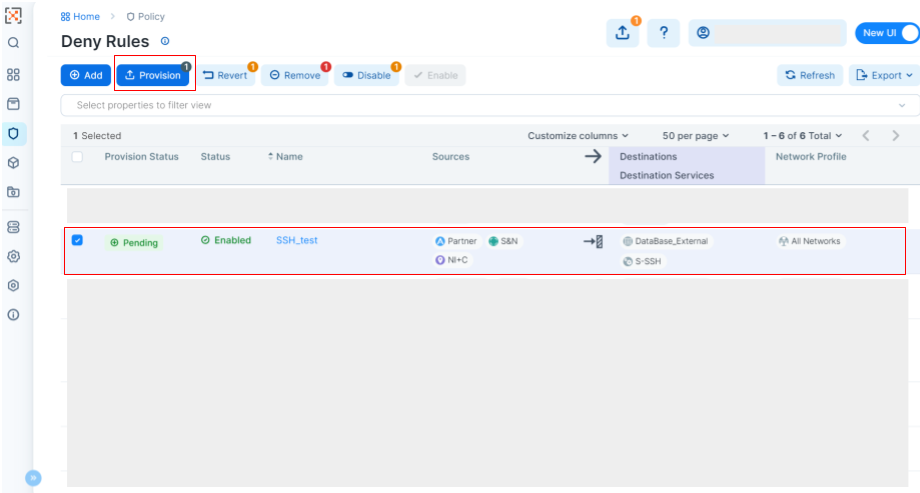
In this case, we’ll select “IP Lists” > “DataBase_External” in order to direct at a designated IP address.
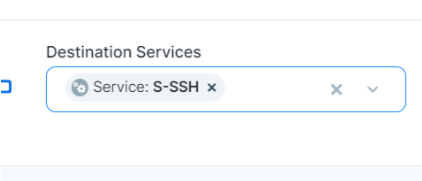
Under “Destination Services,” select the protocol you aim to impede.
Given our focus on SSH traffic, we’ll choose “SSH” for now.
Set the desired “Status” and “Network Profile”, then save your changes by clicking the “Save” button.
You’ll see the following interface when you click on “Save”.
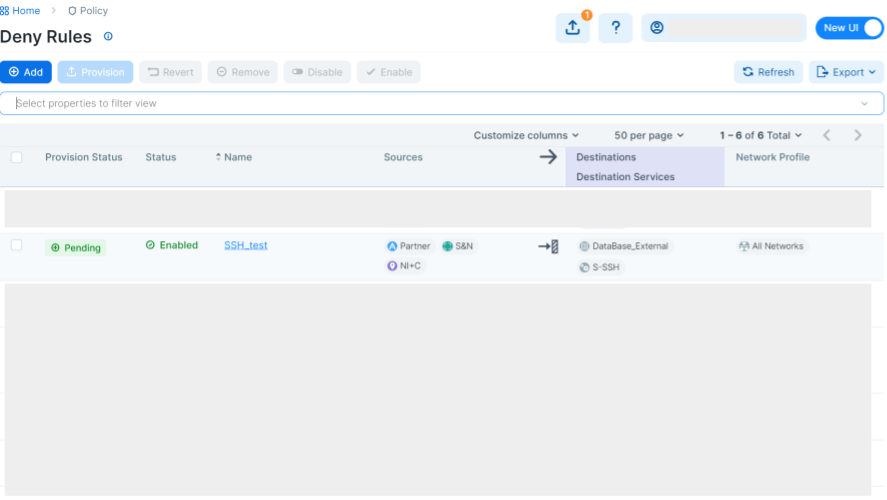
Up to this moment, traffic has yet to be blocked.
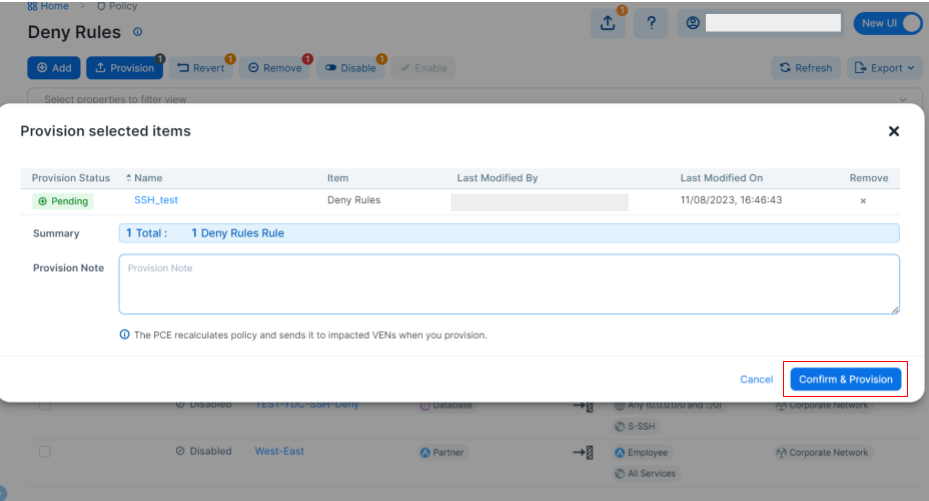
To enforce the blockage, select the appropriate rule and click “Provision”.
After a brief interlude, the policy will be applied.
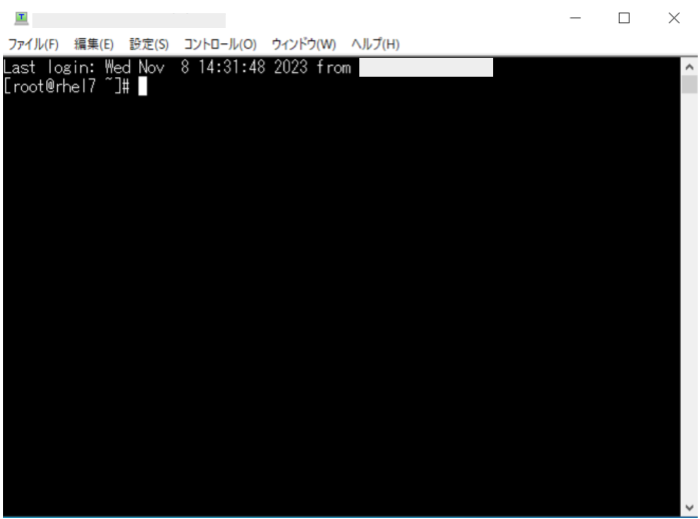
Now let’s see if we can still access the designated IP address.
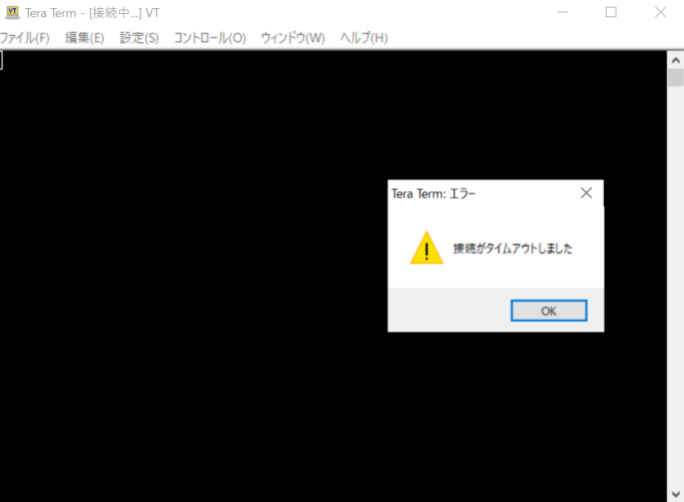
As anticipated, the traffic is now blocked.
The policy to deny SSH communication to a specific IP address has now been applied.
A visual inspection of the MAP swiftly corroborates this.
It depicts permissible traffic paths in yellow and forbidden ones in red.
The red arrow from the specified labels to the IP array provides visual assurance that the policy is effectively obstructing communications.
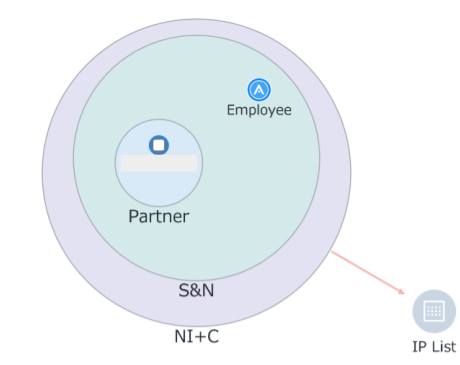
In addition, selecting the workload allows a comprehensive view of the enforced rules.
Evidently, SSH traffic from the sources to DataBase_External is obstructed.

In this scenario, we have not specified any source or destination IP addresses or subnets to block the traffic.
Labeling VENs within each workload allows users to create policies without having to consider IP addresses or subnets.
By setting rules while looking at the visualized traffic, even those who are not familiar with firewall configurations are able to intuitively control the traffic.
The benefits intrinsic to using Illumio include:
- Eliminates the need for complicated rule creation based on IP addresses and subnets.
- The VEN synchronizes even when workload IPs are changed(applicable for cloud migration).
- Automatically creates actual OS firewall rules such as iptables from logical rules.
4. Micro-Segmentation Use Cases
Now, let’s take a look at distinct scenarios where micro-segmentation proves advantageous.
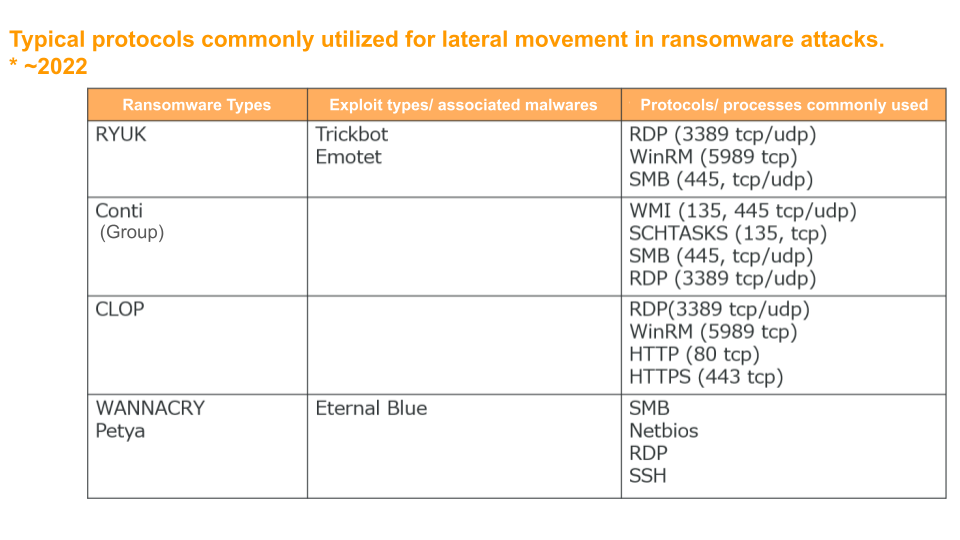
Use Case: Management of ports (which are frequently exploited by ransomware and other types of malware)
Key service ports (e.g., RDP and SSH) are safeguarded under an Enforcement Boundary throughout each workload.
While workloads may be authorized to connect to essential services as necessary, cross-connection between workloads via these service ports is strictly forbidden.
This precautionary measure shuts off the most frequently used attack vector of malwares and restricts lateral (East-West) movement within core services.
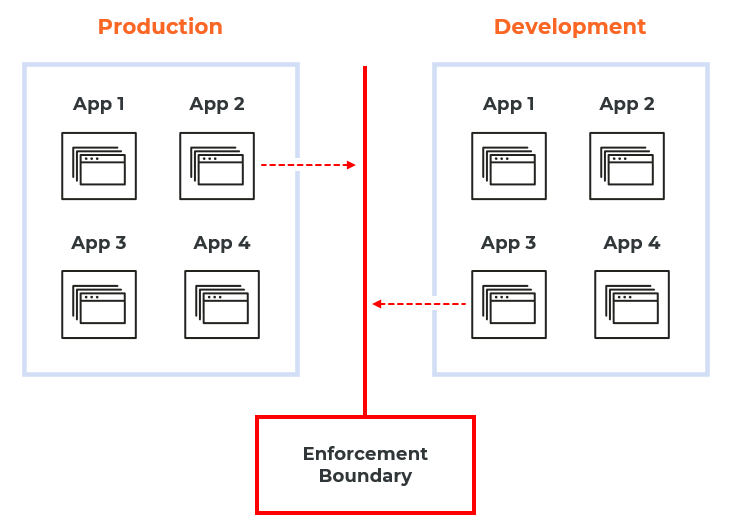
Use Case: Segregating Environments
By configuring a bi-directional Enforcement Boundary, discrete operational environments are virtually demarcated.
Within individual environments (Production and Development), operational exchanges proceed without disruption.
However, unless explicitly authorized in the allowlist (rulesets), no transactional flow is permitted across the Enforcement Boundary.
Conclusion
Hopefully, you now have a better understanding of how to manage communication utilizing Illumio.
Our next blog will be on:
“【Illumio #3】Collaborating With Security-Related Products.”
We hope you will join us for that entry as well when it is available.
For inquiries, please email us at global@niandc.co.jp.


